Monday, 9 November 2009

Tuesday, 20 October 2009
8 shot journey evaluation
Before filming my 8 Shot jouney I had to first create a storyboard. The story board had to show all the shots that I would be filming as well as a description of what is taking place within that shot. A story board also has to meantion what shot type you want to use as well as any sound that takes place within the shot. As the 8 shot Journey I created was meant to be a silent task I didnt meantion anything about sound as there would be any in the film.
Once I'd drawn my storyboard I began 'striping' my tape ready for recording. Striping basically means recording nothing but a black screen. This is important because it helps you aviod taping over footage you recorded. After I striped my tape I gathered together a tripod and camera reday to film.
I directed the 8 shot journey with the help of David Howe as my talent. David's job was to do everything I told him to do. I tried to have every focal point covered throughtout each shot, which turned out to be trickier than I first thought it would be. The reason it proved tricky was because as a film maker I had to think how I'd show depth that would make the shot seem interesting instead of just a single character walking off screen. Once I'd added depth to the shot, I told David to do a run through without the camerea recording to double check that he knew what wanted him to do. I did this for Every shot I filmed and it worked out quite well as we only had about 4 retakes to film, and this partly because people walked in the way of the shot which distracted David.
Once I'd finished filming I uploaded all my footage onto ADOBE Final cut pro. Final cut pro is a video editing software program that is to a professional level. During uploading you need to place 'set in' and 'set out' points, this basically divides up the footage into clips. These clips then need to be 'batched' for them to work on the program ready to be edited. Once I had batched all my video clips I dragged them into a timeline placed at the bottom of the program. This allows to place the clips in any order I want to create a sequence. Once I did this I saved the project as 8 shot journey and then added titles at the beginning and at the end of the sequence and then burned the whole thing to a disc. Once I'd burned the video to Disc I played the disc and uploaded it onto youtube.
Overall the project went pretty well the only thing that went badly was caused by my own human error, that was that i forgot to remove the sound from the video meaning you can hear my voice on the video at the begining 'saying action.' Im future projects I will double check the audio before uploading it online.
Once I'd drawn my storyboard I began 'striping' my tape ready for recording. Striping basically means recording nothing but a black screen. This is important because it helps you aviod taping over footage you recorded. After I striped my tape I gathered together a tripod and camera reday to film.
I directed the 8 shot journey with the help of David Howe as my talent. David's job was to do everything I told him to do. I tried to have every focal point covered throughtout each shot, which turned out to be trickier than I first thought it would be. The reason it proved tricky was because as a film maker I had to think how I'd show depth that would make the shot seem interesting instead of just a single character walking off screen. Once I'd added depth to the shot, I told David to do a run through without the camerea recording to double check that he knew what wanted him to do. I did this for Every shot I filmed and it worked out quite well as we only had about 4 retakes to film, and this partly because people walked in the way of the shot which distracted David.
Once I'd finished filming I uploaded all my footage onto ADOBE Final cut pro. Final cut pro is a video editing software program that is to a professional level. During uploading you need to place 'set in' and 'set out' points, this basically divides up the footage into clips. These clips then need to be 'batched' for them to work on the program ready to be edited. Once I had batched all my video clips I dragged them into a timeline placed at the bottom of the program. This allows to place the clips in any order I want to create a sequence. Once I did this I saved the project as 8 shot journey and then added titles at the beginning and at the end of the sequence and then burned the whole thing to a disc. Once I'd burned the video to Disc I played the disc and uploaded it onto youtube.
Overall the project went pretty well the only thing that went badly was caused by my own human error, that was that i forgot to remove the sound from the video meaning you can hear my voice on the video at the begining 'saying action.' Im future projects I will double check the audio before uploading it online.
8 shot video
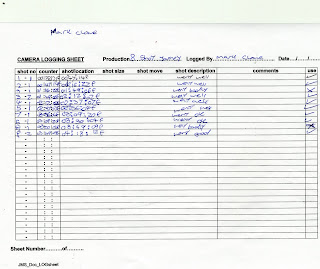
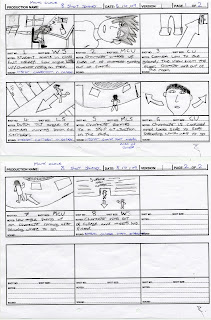
My Storyboard and Log sheet for my 8 Shot Journey: The storyboard is a visual version of my 8 shot Journey hand drawn on paper. A log sheet is a listed document of all the shots you have filmed including number of takes used to track how well the filming went. A good tracking sheet can aid the director when editing because it should list the frame number and how far into the tape you are, this is usually shown as a number. Heres an example of how it should look: 10:56:12 the first two nubers relate too time and last number relates to the number of frames, the camera will play out 24 frames a second.
Here is the youtube link to my 8 Shot Journey video, that I had to make for my video task.


Here is the youtube link to my 8 Shot Journey video, that I had to make for my video task.
Video Production
For the video project we had to create 'a short film' which had to be 8 shots in length and had to tell the story of a character's journey from one place to another. Before making a short film first we had to understand what makes a good short film, as well as the how to film a short film.
Their are three stages In Video production: pre-production, Production and Post-production.
Pre-production
This where you write the script, finding the locations where filming will take place, prop building, set design, auditions, etc. Everything that will be needed during production is planned out in pre-production basically.
Production
The production stage is when you record the film/sound and gather any necessary sound FX.
Post-production
Post-production is when you upload all the footage recorded as well as all the sound recordings and start editing. Editing is where you remove any 'takes' that went badly and organise the footage into what will become the finished film. Editing is also where you add any special effects that are needed to make the finishing touches to the film. Lastly post-production ends with a finished film either burnt to a disc or saved as a video file and put online.
Cinematography
A film is made up of 'frames' that usually play at 24 frames a second to create the illusion of motion on screen. A single 'shot' is made up of continuous motion of frames moving at 24 frames a second until the shot ends. A number of shots make up a 'scene.' Scenes are linked together to form a 'sequence.' Sequences make up a Programme or film.
Shot Types

The picture shows all the different shot types.
When filming a scene first you film the whole scene as a 'wide shot' this is so if their are any problems in editing later you always have a safety shot to fall back on. Wide shots are also good for establishing the scene because it reveals a lot of information to your target audience, such as the location, the characters, etc. After you film the 'wide shot' go in closer to the action and focus on the Key characters as this allows the audience to know who the hero of the story is easily, the best shot to use for this is 'mid-close up' or 'close up' as it allows the audience to zoom in automatically on that character.
Rule of 3rds

The rule of 3rds basically means that when setting up a shot you divide the display screen into a grid 3x3 and set the scene up like the one above: the water is within the bottom three squares and the buildings are in the middle block of squares and the sky is along the top three squares. The reason for this is because its easy on the eye, and just nice to look at when its laid out like this. I used this scene because it was the easiest example to explain the rule with, but the rule of 3rds works on other shots too like close ups.

180 degree line rule

when filming a scene imagine that their is line across the floor, you must not cross this line when filming throughout the whole scene, no matter how many shots you do because for example if your character is walking right to left, they will always appear to walk in that direction no matter where you place your camera on this invisible line unless you cross it, because then it look like they are walking from left to right instead of right to left even though they are still walking that direction. You can shoot either side of the line but you must never cross the line when filming unless you show a camera move physically moving across the line. The only other time you may break this rule is of course unless you want to confuse the audience because in that case it becomes a stylistic thing that if done effectively can look really good on screen.
Stylistic options
the use of diagonal lines can add interest to the shots as they are have nice composition and provide energy to a shot. whereas curved lines can appear graceful and are very easy on the eye compared with straight lines.


Another interesting option is how you choose to have your focus for your shot, you could have it all in Deep focus or maybe decide to have shallow focus. deep focus will have everything in the shot in focus and shallow focus could have only the foreground in shot.


As short film makers you must remember to include something in every 'action plane' action planes are basically foreground, middle ground, background.

Rules for short films
(1) Keep it simple, no need to over complicate the plot.
(2) Highly visual, try to tell the story with just the imagery.
(3) Not many characters, because the story is only short, theirs no need for lots of characters.
(4) Not many locations, again for the same reason as for characters.
(5) Humour/fantasy, most short films are surreal because its easier to make a short film about something surreal compared to serious drama piece short film.
(6) End on a climax, this is to bring all the lose ends up in one go without leaving too many questions at the end.
(7) Anti-narrative, you don't have to necessarily obey normal narrative structure, you may want to begin your story at the very end for example rather than the beginning.
(8) Avoid cliché, because it is isn't original and not very creative.
Their are three stages In Video production: pre-production, Production and Post-production.
Pre-production
This where you write the script, finding the locations where filming will take place, prop building, set design, auditions, etc. Everything that will be needed during production is planned out in pre-production basically.
Production
The production stage is when you record the film/sound and gather any necessary sound FX.
Post-production
Post-production is when you upload all the footage recorded as well as all the sound recordings and start editing. Editing is where you remove any 'takes' that went badly and organise the footage into what will become the finished film. Editing is also where you add any special effects that are needed to make the finishing touches to the film. Lastly post-production ends with a finished film either burnt to a disc or saved as a video file and put online.
Cinematography
A film is made up of 'frames' that usually play at 24 frames a second to create the illusion of motion on screen. A single 'shot' is made up of continuous motion of frames moving at 24 frames a second until the shot ends. A number of shots make up a 'scene.' Scenes are linked together to form a 'sequence.' Sequences make up a Programme or film.
Shot Types

The picture shows all the different shot types.
When filming a scene first you film the whole scene as a 'wide shot' this is so if their are any problems in editing later you always have a safety shot to fall back on. Wide shots are also good for establishing the scene because it reveals a lot of information to your target audience, such as the location, the characters, etc. After you film the 'wide shot' go in closer to the action and focus on the Key characters as this allows the audience to know who the hero of the story is easily, the best shot to use for this is 'mid-close up' or 'close up' as it allows the audience to zoom in automatically on that character.
Rule of 3rds

The rule of 3rds basically means that when setting up a shot you divide the display screen into a grid 3x3 and set the scene up like the one above: the water is within the bottom three squares and the buildings are in the middle block of squares and the sky is along the top three squares. The reason for this is because its easy on the eye, and just nice to look at when its laid out like this. I used this scene because it was the easiest example to explain the rule with, but the rule of 3rds works on other shots too like close ups.

180 degree line rule

when filming a scene imagine that their is line across the floor, you must not cross this line when filming throughout the whole scene, no matter how many shots you do because for example if your character is walking right to left, they will always appear to walk in that direction no matter where you place your camera on this invisible line unless you cross it, because then it look like they are walking from left to right instead of right to left even though they are still walking that direction. You can shoot either side of the line but you must never cross the line when filming unless you show a camera move physically moving across the line. The only other time you may break this rule is of course unless you want to confuse the audience because in that case it becomes a stylistic thing that if done effectively can look really good on screen.
Stylistic options
the use of diagonal lines can add interest to the shots as they are have nice composition and provide energy to a shot. whereas curved lines can appear graceful and are very easy on the eye compared with straight lines.


Another interesting option is how you choose to have your focus for your shot, you could have it all in Deep focus or maybe decide to have shallow focus. deep focus will have everything in the shot in focus and shallow focus could have only the foreground in shot.


As short film makers you must remember to include something in every 'action plane' action planes are basically foreground, middle ground, background.

Rules for short films
(1) Keep it simple, no need to over complicate the plot.
(2) Highly visual, try to tell the story with just the imagery.
(3) Not many characters, because the story is only short, theirs no need for lots of characters.
(4) Not many locations, again for the same reason as for characters.
(5) Humour/fantasy, most short films are surreal because its easier to make a short film about something surreal compared to serious drama piece short film.
(6) End on a climax, this is to bring all the lose ends up in one go without leaving too many questions at the end.
(7) Anti-narrative, you don't have to necessarily obey normal narrative structure, you may want to begin your story at the very end for example rather than the beginning.
(8) Avoid cliché, because it is isn't original and not very creative.
Radio Evaluation
I’ve created jingles before, so knew how to produce them really easily and quickly. For the assignment I had to create three jingles: a news jingle, a show opening and a studio ident. I used ADOBE Sound booth, which I hadn’t used before. The program has a lot of ‘teething problems’ and tendency to freeze without warning. Firstly I choose music on www.youtube.com. That I thought was appropriate for a news jingle which I decided to create first. I decided on one which had consisted of beeps. I choose this because beeps are used on the BBC news and I thought it would do the same for my jingle.
To get the music from YouTube and downloaded into my documents I had go to a website called www.video2mp3.com which converts files from video to audio. Once downloaded it was just a case of importing it into ADOBE Sound booth by clicking Import from file, within ABOBE itself. Then I used the ‘Inbuilt microphone’ to record my voice directly onto the computer, and imported this as well into ADOBE sound booth. I then clicked the ‘multi-track’ tool which allowed me to view them both within a timeline. I then began to edit the tracks by clicking the edit tool which can be found on the corners of each piece of audio.
Within this menu you have complete control over the audio, by right clicking and dragging over the audio you can either delete sections of audio or access other editing tools. I mainly deleted sections of audio that included vocals because I wanted and knew from previous experience that jingles sound distort when rerecording over vocals with other vocal audio. The only other thing I did was fade in and out the audio at the beginning and the end to make the jingle seem more professional. Once I’d done that I exited the edit mode by clicking the back button. The changes where done and then it was simply a caser of clicking and dragging my vocal recording in place to where it I wanted it to be within the overall jingle.
After I had placed the vocal recording of my voice in place I saved my work as ‘Jinglemark1’. Then I clicked the ‘export’ tool which had a side option called save as audio mix down which I clicked I on and saved again but this time, I saved it as a MP3 file so it would work on other computers and could be burned to a disc. I used the same processes to create the other two jingles; the only differences were that I had different music and vocal records for each, and the durations where different. Longer duration for the show jingle because this has to advertise the radio show, the studio Ident was shorter because it only has to advertise the radio station.
I found the program was hard to use at first because I hadn’t used a MAC computer before and didn’t understand what I was doing until I was shown. What I found easy was that I had past experience at making jingles from last year and knew the basics of their creation. What went wrong was the program kept freezing and the fact I was ill at the time, didn’t make things any easier so I didn’t have a lot of time to produce the jingles. Next time I’d put more effect into the jingles because hope I feel better next time I’m asked to produce them.
To get the music from YouTube and downloaded into my documents I had go to a website called www.video2mp3.com which converts files from video to audio. Once downloaded it was just a case of importing it into ADOBE Sound booth by clicking Import from file, within ABOBE itself. Then I used the ‘Inbuilt microphone’ to record my voice directly onto the computer, and imported this as well into ADOBE sound booth. I then clicked the ‘multi-track’ tool which allowed me to view them both within a timeline. I then began to edit the tracks by clicking the edit tool which can be found on the corners of each piece of audio.
Within this menu you have complete control over the audio, by right clicking and dragging over the audio you can either delete sections of audio or access other editing tools. I mainly deleted sections of audio that included vocals because I wanted and knew from previous experience that jingles sound distort when rerecording over vocals with other vocal audio. The only other thing I did was fade in and out the audio at the beginning and the end to make the jingle seem more professional. Once I’d done that I exited the edit mode by clicking the back button. The changes where done and then it was simply a caser of clicking and dragging my vocal recording in place to where it I wanted it to be within the overall jingle.
After I had placed the vocal recording of my voice in place I saved my work as ‘Jinglemark1’. Then I clicked the ‘export’ tool which had a side option called save as audio mix down which I clicked I on and saved again but this time, I saved it as a MP3 file so it would work on other computers and could be burned to a disc. I used the same processes to create the other two jingles; the only differences were that I had different music and vocal records for each, and the durations where different. Longer duration for the show jingle because this has to advertise the radio show, the studio Ident was shorter because it only has to advertise the radio station.
I found the program was hard to use at first because I hadn’t used a MAC computer before and didn’t understand what I was doing until I was shown. What I found easy was that I had past experience at making jingles from last year and knew the basics of their creation. What went wrong was the program kept freezing and the fact I was ill at the time, didn’t make things any easier so I didn’t have a lot of time to produce the jingles. Next time I’d put more effect into the jingles because hope I feel better next time I’m asked to produce them.
My Radio Jingles
Below are links to my Jingles, just click on the name to of the jingle you wish to listen too and the link will open to a website that will play it:
Jingle show
News show
Studio Ident
once on the website just click the play button on the website, here is a screen shot of the website:

Jingle show
News show
Studio Ident
once on the website just click the play button on the website, here is a screen shot of the website:

Monday, 19 October 2009
Radio Jingles
A Radio Jingle is designed to advertise something such as a radio show, station events or other media products like upcoming films or TV shows and of course commercial products. Other Jingles include station idents which are important for listeners to know what radio station they are listening too. All Jingles are different as they each have their own target audience they appeal too.
When making a Jingle it’s important to know what it’s for, and who’s it for? A BBC radio 1 audience for example tend to have jingles with lots of sound FX and echo affects that feature lots of non-diegetic sounds that are constantly changing and have been computer edited. Also the voice over tends to contain an echo also. The Jingle tends to last for at a minute which is quite long for a Jingle. They sometimes will play lots of small sections from songs that might be played within the show itself to allow the audience to know the theme of the show that Jingle is intended for.
However a Jingle for BBC radio 4 targets a much older audience and they tend to be much shorter in length only about 30 seconds at most. They feature soft melody background music that can be linked to the host of the show. The voice over is softly spoken in an clear manner that is easily understood, there are no sound FX or echo’s used at all.
Station idents are different from normal Jingles as they never change and always sound similar no matter what station you listen too.
Codes and Convention of a radio Jingle
• They always contain speech in the form of a voice over that provides clear and relevant information.
• They always have music that is also relevant to the target audience.
• Station idents occur frequently and are always the same sounding on every radio station.
• Radio Show promotions always give the name of the show and who is presenting along with the time of day the show is on. They might also either play clips from past shows or play clips of music that relevant to the show.
• News shows always play a formal piece of music or have beeps that signal’s to the audience the news is about to begin.
Three Jingle Ideas for SNC LIVE the college radio station
Here are three possible ideas for Jingles that could be used on the Suffolk New College radio station SNC LIVE, one of these is a station ident.
“This is SNC LIVE” – the music I’d use for the station ident would be a mellow chilled out piece of music that would be easily recognisable and catchy so you would remember it. It would be perhaps 10 seconds in length.
“Welcome to heavy metal rock show with me Mark Clowe, it’s the only rock show for students” – I’d use a wide range of different rock music within this Jingle to express that I’m targeting a teenage audience of students who listening to alternative music. Sounds FX that I could use would include roars and screams and maybe an echo effect on my voice to fully express my target audience. This Jingle will last about 40 seconds.
“This SNC LIVE NEWS” – For the news Jingle I’d use a piece of music that either features a drum beat or beep sound within it. Because most news programs have beep, beep sound FX at the beginning to allow the audience to know that the news is about to start and I want to do a similar thing with my Jingle. This Jingle will last for 15 seconds just long enough to say what needs to be said.
When making a Jingle it’s important to know what it’s for, and who’s it for? A BBC radio 1 audience for example tend to have jingles with lots of sound FX and echo affects that feature lots of non-diegetic sounds that are constantly changing and have been computer edited. Also the voice over tends to contain an echo also. The Jingle tends to last for at a minute which is quite long for a Jingle. They sometimes will play lots of small sections from songs that might be played within the show itself to allow the audience to know the theme of the show that Jingle is intended for.
However a Jingle for BBC radio 4 targets a much older audience and they tend to be much shorter in length only about 30 seconds at most. They feature soft melody background music that can be linked to the host of the show. The voice over is softly spoken in an clear manner that is easily understood, there are no sound FX or echo’s used at all.
Station idents are different from normal Jingles as they never change and always sound similar no matter what station you listen too.
Codes and Convention of a radio Jingle
• They always contain speech in the form of a voice over that provides clear and relevant information.
• They always have music that is also relevant to the target audience.
• Station idents occur frequently and are always the same sounding on every radio station.
• Radio Show promotions always give the name of the show and who is presenting along with the time of day the show is on. They might also either play clips from past shows or play clips of music that relevant to the show.
• News shows always play a formal piece of music or have beeps that signal’s to the audience the news is about to begin.
Three Jingle Ideas for SNC LIVE the college radio station
Here are three possible ideas for Jingles that could be used on the Suffolk New College radio station SNC LIVE, one of these is a station ident.
“This is SNC LIVE” – the music I’d use for the station ident would be a mellow chilled out piece of music that would be easily recognisable and catchy so you would remember it. It would be perhaps 10 seconds in length.
“Welcome to heavy metal rock show with me Mark Clowe, it’s the only rock show for students” – I’d use a wide range of different rock music within this Jingle to express that I’m targeting a teenage audience of students who listening to alternative music. Sounds FX that I could use would include roars and screams and maybe an echo effect on my voice to fully express my target audience. This Jingle will last about 40 seconds.
“This SNC LIVE NEWS” – For the news Jingle I’d use a piece of music that either features a drum beat or beep sound within it. Because most news programs have beep, beep sound FX at the beginning to allow the audience to know that the news is about to start and I want to do a similar thing with my Jingle. This Jingle will last for 15 seconds just long enough to say what needs to be said.
Subscribe to:
Posts (Atom)